
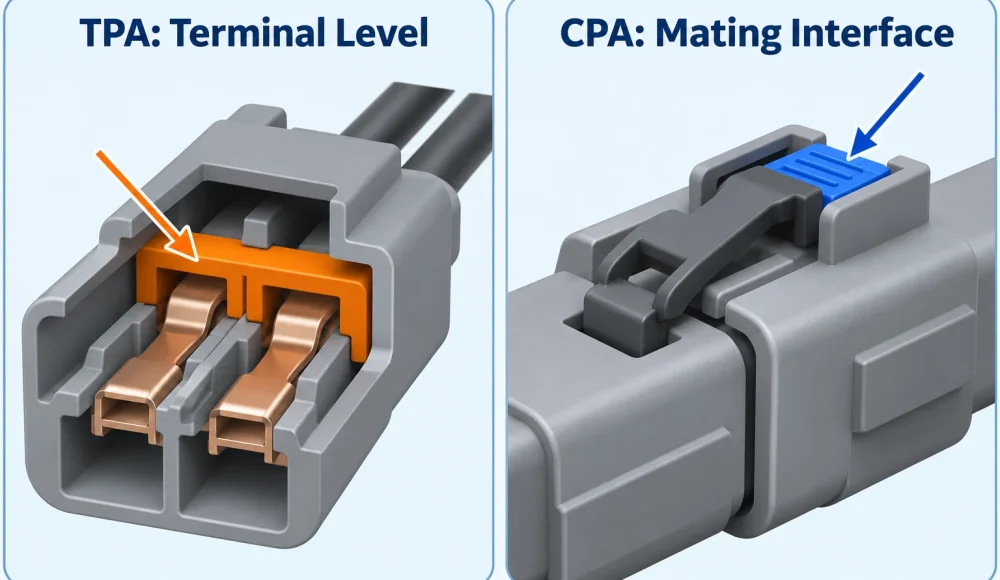
Connector TPA and CPA features address different assembly risks. TPA concerns terminal seating and retention inside a housing. CPA concerns the mated connector interface. You need the correct components, defined assembly states and separate checks before approving a custom harness.
Distinguish Terminal Retention From Connector Mating
Your TPA and CPA requirements should identify which mechanical interface each feature controls.
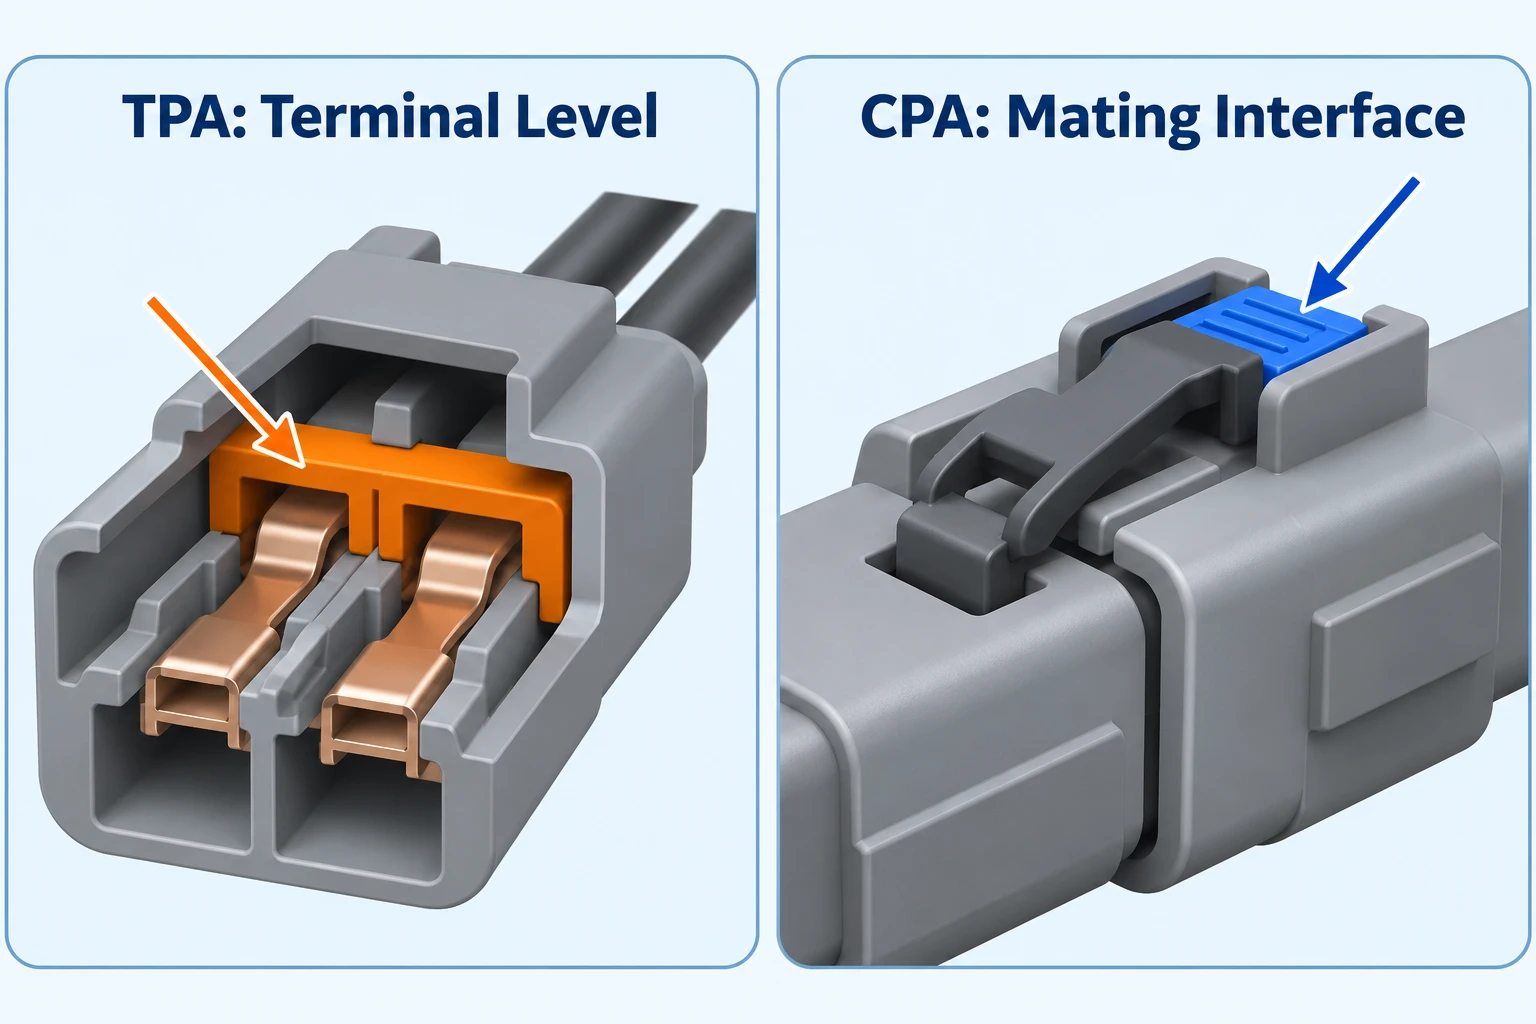
TPA means terminal position assurance. CPA means connector position assurance. The TE NTSEAL FAQ distinguishes correct contact installation from correct connector assembly and protection against accidental unmating. Those functions should remain separate in your drawing review.
Imagine a correctly mated pair of housings containing one improperly installed terminal. The external latch may appear satisfactory while that individual circuit remains vulnerable. Conversely, correctly retained terminals cannot secure two housings that have not been properly mated.
Neither feature replaces the connection between the conductor and terminal. Your crimp requirements still govern that interface. Keeping these three relationships separate makes inspection responsibilities easier to define.
The Molex contact retention guide describes connector-level and terminal-level retention as distinct design functions. It also shows that TPA implementations differ. Do not assume every retainer has the same operating principle.
Use the manufacturer's terminology for your actual connector. A secondary lock, wedge or independent retainer may have a specific documented role. Similar appearance does not establish identical function or compatibility.
Identify Every Required Lock Component
Your bill of materials should identify the complete connector configuration, including its required retainers and assurance parts.
Start with both mating housing references and their intended terminals. Check cavity count, coding and relevant variants. Then establish which lock components arrive installed and which must be ordered separately.
Do not rely on a catalog image to define the supplied assembly. A photograph may show optional accessories or a different configuration. Check the applicable product drawing and ordering information.
Record whether a lock is integral, separately supplied or installed in a preliminary position. Include the appropriate reference and quantity when separate parts are required. This prevents a small omitted component from becoming a final assembly shortage.
Consider purchasing responsibility for both connector halves. Your harness supplier may provide only one side, while the equipment manufacturer supplies the counterpart. Compatibility needs confirmation across that boundary.
Keep approved substitutions under control. A changed housing or terminal reference can affect lock compatibility even when its mating outline appears similar. Your harness revision process should capture changes to these small parts as well.
Define Preliminary And Final Lock States
Your assembly instructions should distinguish each permitted preliminary state from the required final state.
Connector manufacturers may describe pre-lock, preload, shipping or final-lock positions. These terms refer to particular mechanisms and instructions. Do not translate them into a universal travel distance or appearance rule.
The Molex Mini-Fit TPA2 application specification identifies separate retainer and CPA components. Its CPA sequence follows full mating and moves from preliminary engagement to final engagement. Treat that sequence as a product-family example, not instructions for every connector.
For your chosen system, identify the condition needed before each lock operation. Then identify the evidence that confirms completion. Your team needs an observable result rather than an instruction to push until it “looks right.”
Use manufacturer drawings or controlled photographs of approved samples to clarify the states. Identify the viewing direction and the relevant features. Avoid photographs that hide the lock behind wires or protective covers.
Also define the state required for shipping. A completed harness may need its TPA secured while its CPA remains ready for later mating. Confirm the manufacturer's instructions and your integration plan before applying that arrangement.
Review TPA Assembly With Terminal Insertion
Your TPA review should connect terminal insertion, retainer operation and the specified finished condition.
Confirm each terminal's orientation before insertion. The terminal and cavity must match the approved configuration. Correct lock operation cannot correct a terminal assigned to the wrong circuit position.
Inspect the terminal and relevant housing features before assembly. Damaged retention features or debris can complicate seating. Keep suspect components separate rather than trying to compensate during retainer installation.
Follow the connector manufacturer's assembly sequence. Some designs use a primary retention feature before a secondary retainer engages; other architectures differ. Confirm the actual mechanism before writing operator instructions.
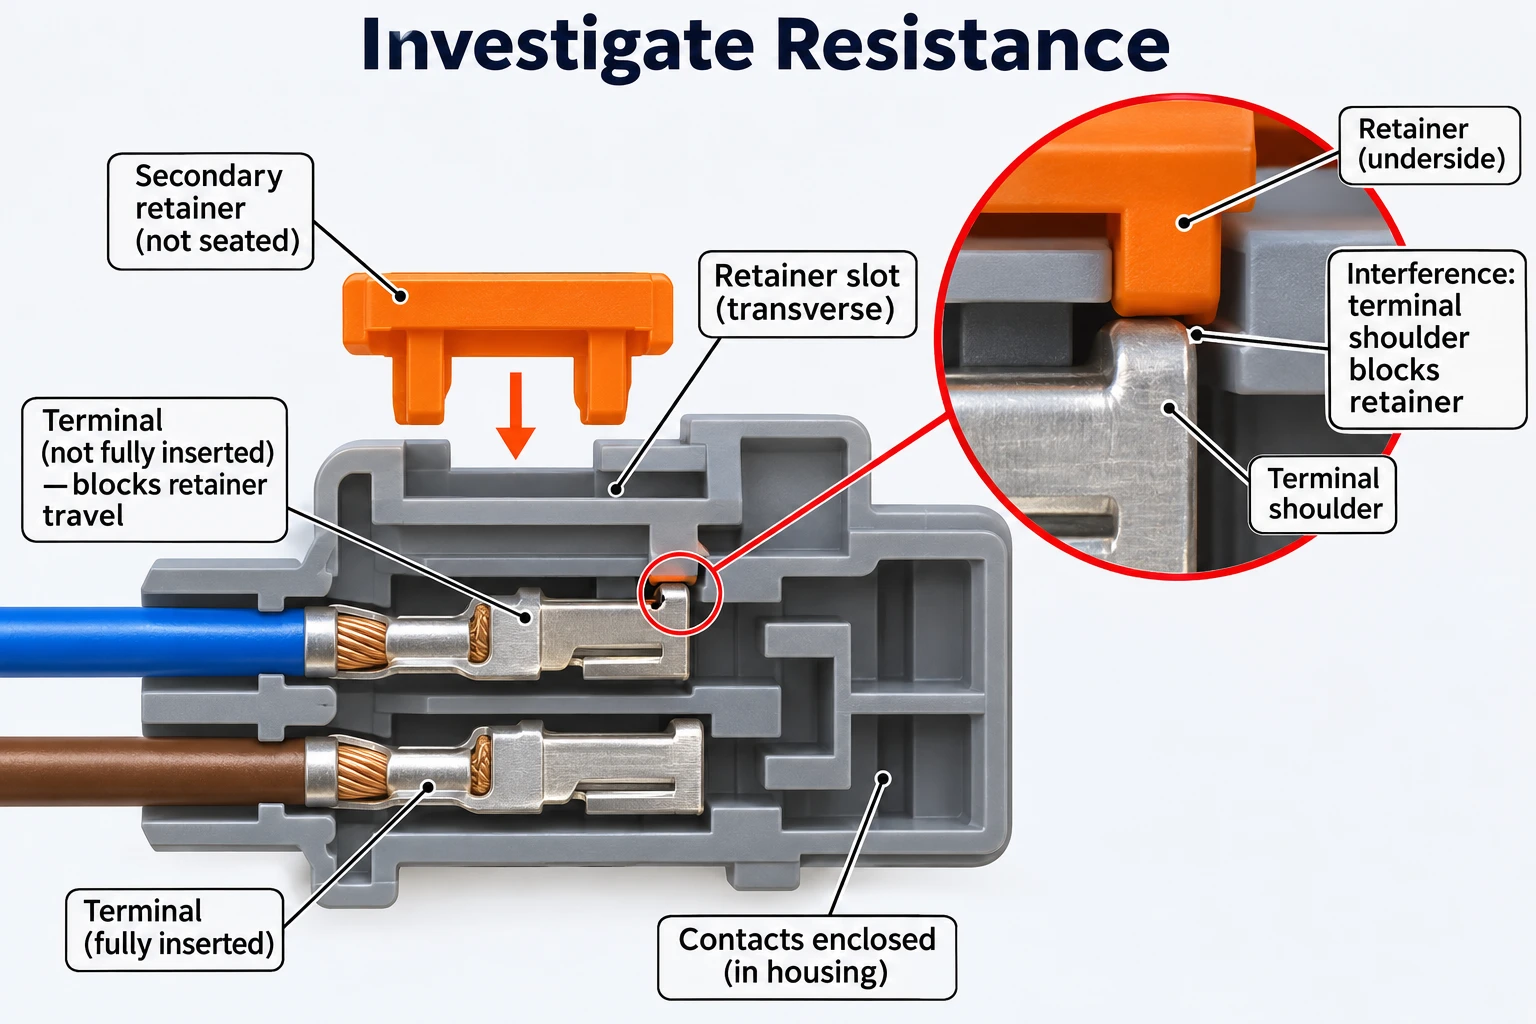
If a retainer resists movement, stop and investigate using the approved procedure. Possible causes include incomplete terminal seating, incorrect orientation, incompatible parts or damage. Do not treat increased force as a general troubleshooting method.
Define any seating verification required by the application document. If a prescribed check involves the wire, identify its method and limits. Avoid adding an uncontrolled pull that could damage an otherwise satisfactory assembly.
Keep force measurements separate from routine position checks. Your terminal retention testing plan may require dedicated samples or a defined fixture. A brief handling check does not establish a published retention rating.
Review CPA Assembly After The Mating Operation
Your CPA procedure should verify the required mating condition before completing the assurance operation.
Confirm the correct counterpart before joining the housings. Coding and orientation matter independently of latch position. Your drawing should identify both halves rather than describe one side as a generic matching connector.
Follow the specified mating method, including any lever or assist mechanism. Inspect the resulting engagement using the manufacturer's acceptance features. Do not infer full engagement solely from a sound heard during assembly.
Molex's retention guide describes CPA designs that restrain release of the primary latch. This explains why CPA is not simply another name for that latch. You still need the primary mating condition established correctly.
Do not use a CPA slider as a substitute for the prescribed mating operation. If it cannot reach its required position, investigate the actual configuration. Follow product-specific instructions rather than forcing the lock or modifying its features.
Record the final state using a clear inspection view. Depending on the connector, this may involve visible position, alignment or other documented evidence. Agree the actual criterion before approving your assembly sample.
If equipment testing requires later disconnection, include the release sequence in the work instruction. A production test should not create an undocumented service cycle. Your final inspection must reflect the assembly state after testing finishes.
Inspect Mechanical States Separately From Electrical Results
Your inspection plan should assess lock completion separately from circuit continuity and connection quality.
An electrical test can evaluate the circuit relationship present during that test. It does not necessarily demonstrate correct secondary lock engagement. Keep the mechanical acceptance checks visible within your release plan.
Likewise, a completed TPA does not prove correct cavity assignment. Your connector pinout verification should confirm the approved circuit map using a clearly defined viewing orientation. Mechanical retention and electrical identity answer different questions.
Build your inspection record around specific observations. Identify the housing reference, terminal configuration, lock state and evidence required. A checkbox labeled “connector OK” may conceal several unexamined assumptions.
Agree when inspection occurs relative to covers, backshells and protective components. Some features become less accessible after finishing. Check them before concealment and confirm that later operations do not disturb the accepted state.
Use approved samples or reference images for training where helpful. Keep them linked to the correct connector revision. A reference from another connector family can teach the wrong visual expectation.
Define inspection frequency and records through the customer quality agreement. No single sampling frequency suits every connector or process. Consider defect visibility, assembly controls and the applicable product requirements.
| Interface Or Feature | Main Question | Separate Evidence To Review |
|---|---|---|
| Conductor To Terminal | Was The Wire Properly Terminated? | Specified Crimp Or Connection Checks |
| Terminal Inside Housing | Is The Terminal Correctly Seated? | Terminal And TPA Acceptance Features |
| Mated Housing Pair | Is The Interface Fully Engaged? | Primary Latch And CPA Acceptance Features |
| Circuit Assignment | Are The Correct Cavities Connected? | Approved Pinout And Electrical Test |
| Environmental Boundary | Is The Specified Sealing Configuration Complete? | Seals, Plugs And Applicable Validation |
Assign Responsibility Between Harness And Equipment Assembly
Your production agreement should state who completes and verifies each lock operation.
The harness manufacturer may install terminals and complete the TPA before shipment. The equipment assembler may perform final mating and CPA engagement later. Confirm this division for your actual product rather than assuming it.
Identify the required shipping state at every connector. Include protection for unmated interfaces and loose accessories where applicable. Packaging should preserve the defined state without hiding missing components.
Specify which checks happen at harness release and which happen during equipment integration. If a test fixture temporarily mates with the connector, explain how the assembly returns to its shipping condition. Avoid contradictory instructions between departments.
Consider customer-supplied connectors and replacement parts too. State who verifies their references and condition before processing. A supplier cannot resolve an undocumented interface change simply by following the previous work instruction.
Keep responsibility visible in your first-article record. Include the intended counterpart and integration context when they affect access or acceptance. A sample inspected alone may not reveal problems inside the equipment.
Preserve Service Access And Wire Routing
Your installed layout should permit the specified lock operation without imposing unwanted loads on the connector.
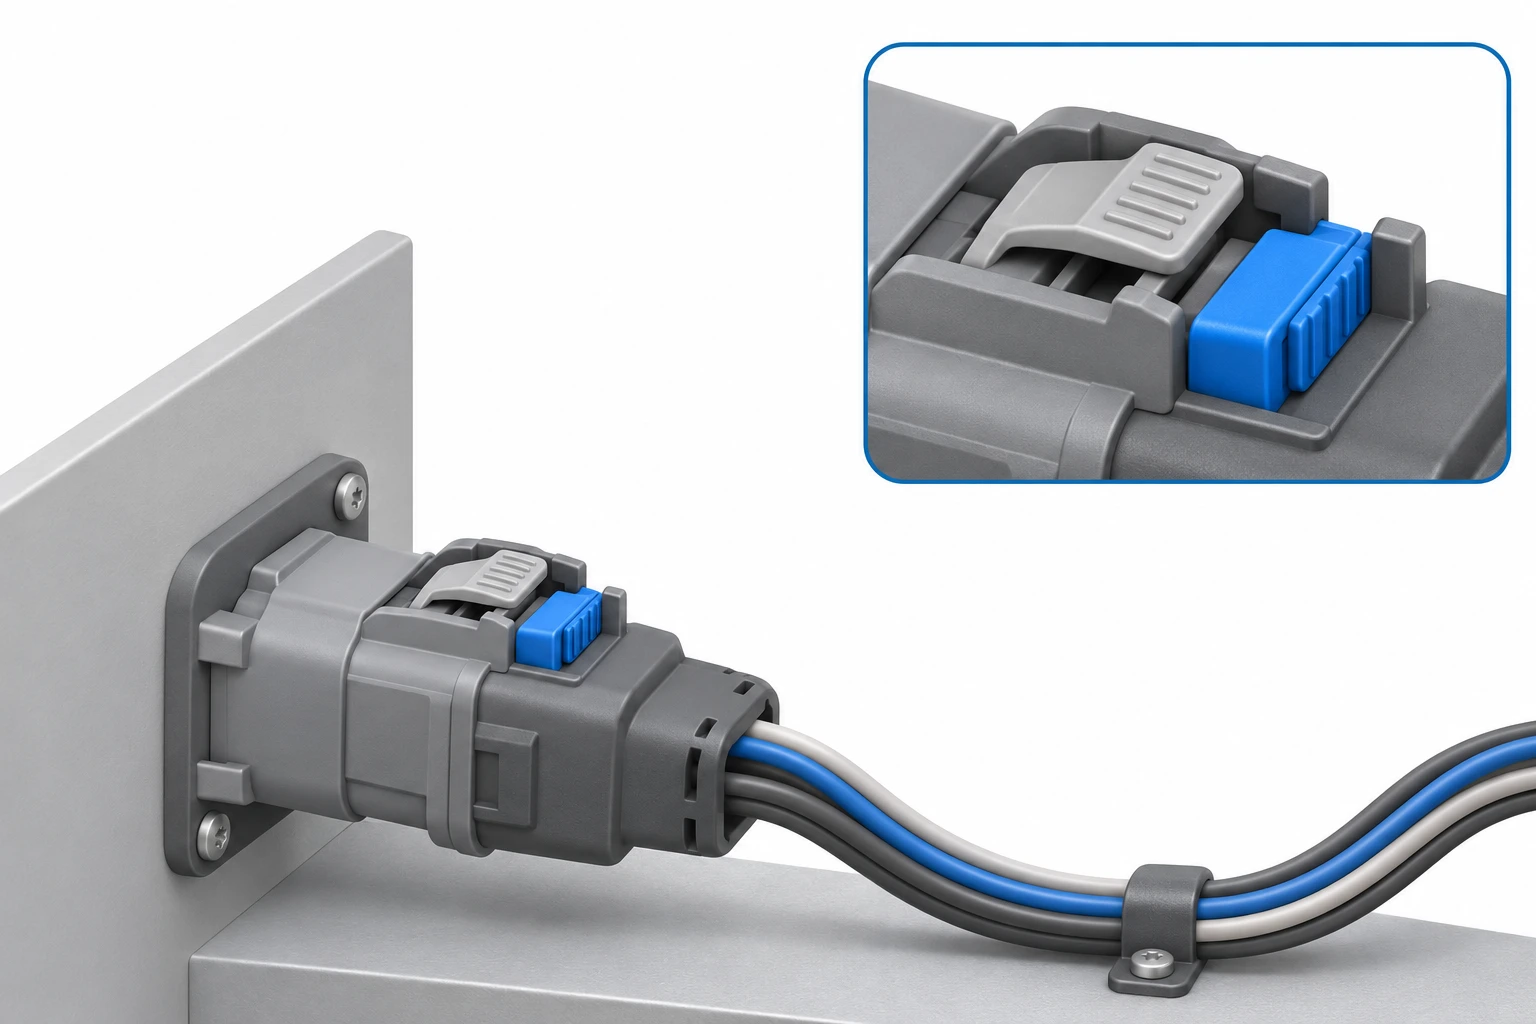
Review access with the connector mounted in its intended location. A lock that operates easily on a bench may become difficult beside a panel. Check nearby components, covers and routing hardware during the design review.
Provide the space needed for the manufacturer's approved service method. Do not invent a universal finger clearance or tool envelope. Confirm the actual release direction and permitted tool with the product documentation.
Review the wire exit region as part of this check. Tight routing can obstruct access or load the terminal region. The required slack and restraint arrangement depend on the assembly construction and installation.
Your cable tie specification should preserve those access requirements. A tie placed for a tidy appearance can interfere with later connector servicing. Evaluate the installed function before approving its position.
Also consider repeated servicing. Use your connector mating-cycle review to define the relevant use conditions. An assurance lock does not establish unlimited service life or override component replacement instructions.
Keep Lock Assurance Separate From Environmental Ratings
TPA or CPA engagement does not independently establish an environmental protection rating for your finished assembly.
Locking and sealing features can coexist, but they address different requirements. Check the specified seals, cavity plugs, backshells and mating conditions. A visually completed lock cannot confirm every element of the sealing boundary.
Use the mated and unmated IP rating guide when defining environmental acceptance. Identify the actual protected configuration and applicable validation. Do not transfer a family rating to a partially assembled connector.
Apply the same caution to vibration, current and temperature requirements. A particular assurance feature may contribute to a connector system's performance. Your acceptance still depends on the complete approved construction and relevant test basis.
Keep these distinctions in quotation discussions. Ask for the required locking features and environmental scope as separate items. This prevents a general statement about connector security from becoming an unsupported finished-harness guarantee.
Control Damage, Rework And Replacement Parts
Your rework procedure should follow the connector manufacturer's limits for release, extraction and reuse.
Inspect damaged or difficult locks before deciding whether components remain usable. Record deformation, broken features and the operation that exposed the problem. Keep suspect parts identified until disposition.
Do not assume a housing and its terminals have identical reuse permissions. The Mini-Fit TPA2 application document, for example, gives component-specific extraction and reuse instructions. Obtain the applicable instructions for your selected connector before planning repair.
Use the specified extraction or release tooling where required. Improvised methods can alter retention features without making the damage obvious. Rework instructions should identify the correct component and operation together.
After repair, repeat the relevant mechanical and electrical checks. Confirm the lock state, circuit assignment and any disturbed protective components. Document the final disposition rather than relying on the fact that the connector mates again.
Review replacement part availability before committing to a service strategy. Some accessories may require specific ordering references or supply arrangements. Include those details in your maintenance and purchasing records.
Compare The Complete Assembly Cost
Compare connector quotations using the complete hardware, assembly and verification scope.
A separate retainer or CPA adds a purchasing and handling requirement. Preassembled parts may change those operations, but they still require correct state verification. Compare the actual work content rather than counting loose components alone.
Include access-related labor in your review. Difficult mating or lock engagement inside the equipment can affect integration work. A slightly different layout may deserve evaluation before tooling and harness routing become fixed.
Clarify sample approval and inspection deliverables. Detailed photographic records, dedicated force measurements or special validation require agreed methods. Do not assume every additional record is included within a standard harness quotation.
Provide order quantity and expected annual demand. Identify the approved connector references and any unresolved selection decisions. This allows the supplier to distinguish a production build from a configuration still requiring engineering review.
Review Connector Lock Requirements With XSD
You can ask XSD to review connector assembly and lock requirements against your approved harness documentation.
XSD's manufacturing capabilities include connector assembly, terminal orientation and secondary locks where applicable. These documented operations support a configuration review. They do not establish universal locking forces, proprietary connector design capability or certification from a connector manufacturer.
Send both housing references, terminals, lock parts and applicable application documents. Include the intended shipping state and equipment integration responsibilities. Identify any customer-specific inspection or validation requirements before quotation.
Agree the sample review with the intended counterpart where necessary. Define who confirms final mating inside the equipment. Keep unresolved access or compatibility questions visible rather than closing them through an unsupported assumption.
Frequently Asked Questions
Your TPA and CPA decisions should resolve function, hardware, completion state and responsibility before production approval.
What Is The Difference Between TPA And CPA?
TPA concerns terminal positioning and retention within a connector housing. CPA concerns assurance at the mated housing interface. Check the actual product design because mechanisms and assembly sequences differ.
Does Every Connector Need Both Features?
No. Connector systems use different retention designs. Select a system that meets your application's requirements. Do not add an incompatible assurance part to a connector designed for another mechanism.
Does A Closed CPA Prove Every Terminal Is Correct?
No. You still need the specified terminal seating, cavity assignment and connection checks. External mating assurance cannot replace inspection of those separate interfaces.
Can You Force A TPA Into Position?
Follow the manufacturer's procedure and permitted limits. Investigate unexpected resistance rather than using additional force as a general remedy. Incomplete insertion, incorrect parts or damage may require correction.
Is A Continuity Test Enough To Verify The Locks?
No. Electrical results do not independently establish mechanical engagement. Inspect the relevant lock features using the approved method alongside your circuit tests.
Should The CPA Be Engaged Before Shipment?
The required state depends on the connector instructions and integration plan. Define it explicitly. An unmated harness shipment may need a different state from a completed equipment assembly.
Can You Reuse A Removed Retainer Or Terminal?
Check component-specific instructions and condition. Do not assume all parts share the same reuse permission. Follow the approved rework disposition and repeat the relevant checks.
What Information Is Needed For A Harness Quotation?
Provide the drawing, complete connector references, application documents and quantities. Include shipping states, mating responsibility and inspection requirements. Identify any unresolved design choices before sample approval.
Send Your Connector Assembly Requirements
Send your drawing, connector references, lock details and expected quantities for review. Include assembly states and inspection requirements. Contact XSD for a harness quotation so your proposed manufacturing scope includes the locking functions your equipment needs.